QLA Sidewalk Sign User Guide
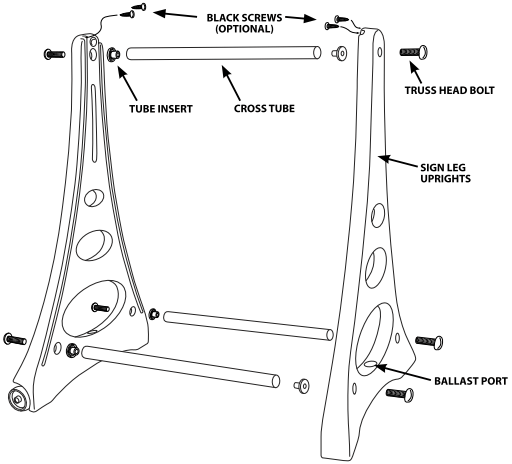
- On a level surface attach Cross Tubes to Uprights using Cross Tube Inserts (small bushings) and Truss Head Bolts. Put Tube Insert into Cross Tube (small end in), slide Cross Tube into deep recess of Sign Leg, insert Truss Head Bolt from outside and tighten. Repeat until all 3 Cross Tubes are in place in both legs.
- Slide any 24″ × 36″ × 4mm sign panel into the Sign Channel on the inside of the Sign Legs. Make sure to put sign panels on both sides. The QLA™ will accept corrugated plastic, expanded PVC and most semi-rigid substrates, along with Message Board sign faces and Grip-It® snap frame panels.
- For security install the 4 Black Screws into the holes in the top of the sign channels to keep the sign from pulling out. This is optional.
- For wind resistance up to 40+ mph add 2-3 quarts of water or sand to each Sign Leg through the Ballast Port in the bottom oval of each Sign Leg by removing the Cap. Sandbags can also be placed across the bottom oval or the sign can be attached to ground stakes.
- To move the QLA™ just grip the top of the Sign Leg that has wheels, tip the sign onto the wheels and pull to roll sign.
HELPFUL HINTS
- For more interest put a different message on each side of the sign.
- For more variety make reversible sign faces by decorating both sides of the sign face so that the customer can change the message and keep a fresh look.
- Taller sign panels can be used with the top protruding out of the top for more impact.
- Combine graphics with letter tracks and changeable letters or headers to create a custom Message Board sign.
- Use Grip-It® snap frame rails to display thin materials like styrene, waterproof card stock, etc. from 0.010″ - 0.050″ thick.
- Keep message short and simple for maximum impact.
QLA™ Quick Load A-frame sidewalk/curb signs are designed for winds up to 30 - 40 mph. In the event of higher winds bring sign inside or add more ballast.